Archetype 5: Sequence – process timeline
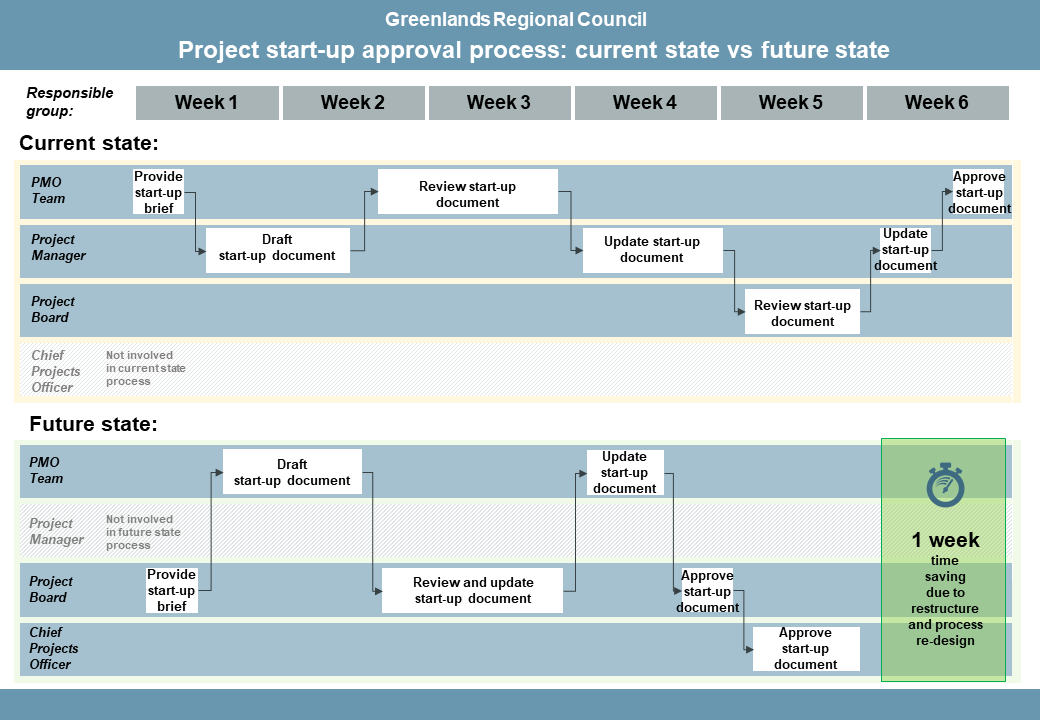
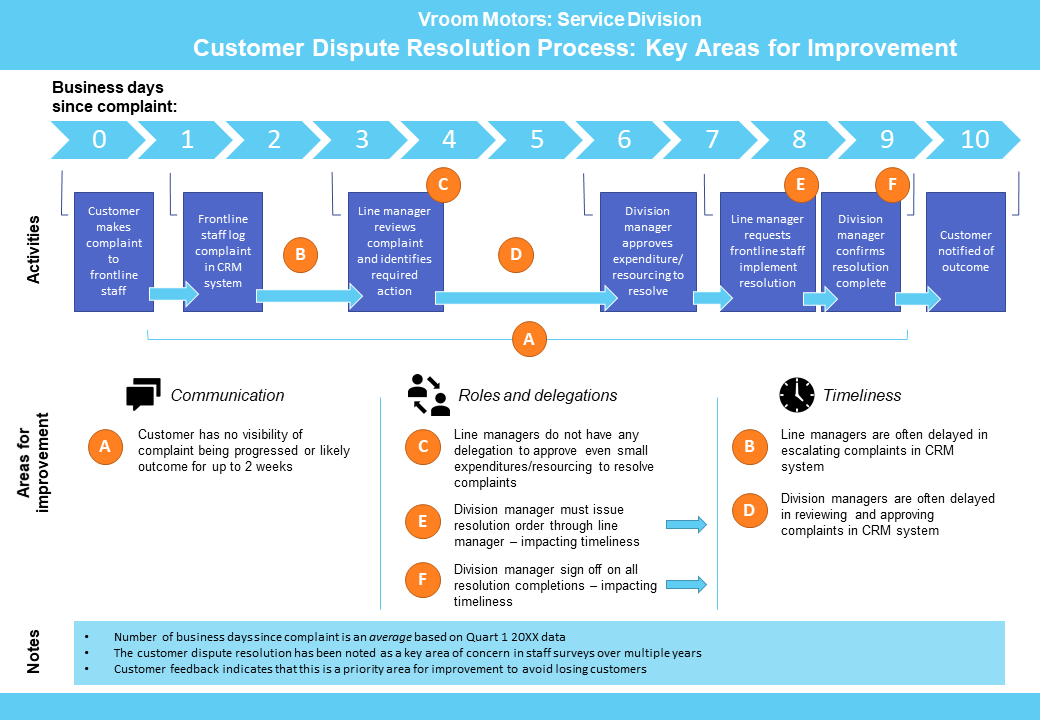
This archetype is used to communicate the order of tasks in a process against time. The editable PowerPoint files for the examples of this archetype are provided at the end of this chapter for you to use and adapt, along with annotated versions of the archetypes to show the key elements in their design.
Example A: Sequence – process timeline

Example B: Sequence – process timeline

Guidelines for tailoring the archetype
| Archetype | Sequence - process timeline |
|---|---|
| Purpose | This visual archetype is used to communicate the order of tasks in a process against time. This may include: • showing a complex process about the project management tasks or technical tasks associated with the project • comparing current state (as is) and future state (to be) processes This archetype is similar to formal process mapping methods (such as business process modelling and notation) but is simpler and more flexible. |
| Information you will need | • What are the activities in the process? • The sequence/order of activities in the process • The duration of each activity (particularly if you want to show relative length of each activity against a timeline) • If you're using rows to highlight who is undertaking each activity, who is responsible for each activity? • Artefacts or documents associated with each activity (if this is important to show) |
| Tips | • Present the level of detail relevant to the stakeholders who will use the diagram • Focus on what you want to highlight in presenting the diagram - for example, is it a shorter process in the future state version or is it different people being involved in the process? (This will impact how you draw the diagram) |
| Page layout | • Landscape is recommended • Timeline is across the top of the page with the process flowing from left to right joined by arrows • Rows going down the page may be used to designate responsibility/people/groups or types of activities (e.g. planning, executing or approval) |
| Text | • The timeline will require labels such as minutes, days or weeks • Each activity in the process will require a label |
| Imagery | • Represent each activity in the process as a box (ideally the width of its duration against the timeline) • Join the boxes with arrows to show the order of the tasks • Tasks should flow from left to right |
| Colour | • Consider using one or two colours for the outlines of the areas on the page and for the timeline • Ensure any colours/patterns have purpose - there's no benefit to using a different colour for each activity |
| Legend | Use a legend for: • the meaning of any colours/patterns (or ensure there is a text label with this information) • any abbreviations |
| Notes | Nil |
Example A: Sequence - process timeline (with annotations)
Click the blue information buttons on the diagram below to see annotations explaining the reasons for choosing these visual elements.
Example B: Sequence – process timeline (with annotations)
Click the blue information buttons on the diagram below to see annotations explaining the reasons for choosing these visual elements.
‘Sequence – process timeline’ templates
The templates shown above are freely available for you to use and adapt. You can download them using the links below:
Please note: The icons in Example B are sourced from Noun Project and are licensed under a Creative Commons Attribution licence:
- Speech bubbles: Communication by Agus Raharjo
- People: Communication by ProSymbols
- Clock: Clock by art shop

