14 Designing Your Open Text in Pressbooks
Pressbooks is a simple book publishing tool. Put your content into Pressbooks, edit as you like, and create beautiful open texts! This chapter gives you a quick overview of Pressbooks, which can be explored in more detail in the Pressbooks User Guide.
The Simple 5-Step Guide to Making an Open Text with Pressbooks
- Create a book. Contact the OEP team who will create a book shell for you to start working on.
- Add your book information. This includes important elements like the author’s name, the title, and the copyright licence. This information can be added to the Book Information page.
- Add and organise your text. Import a manuscript or add to your chapters, then structure the content on the Organise page.
- Choose your book’s theme. Themes are the design templates for your book which you can select by going to Appearance > Themes.
- Export your book. Export formats include EPUB (for Nook, iBooks, and more), PDF (for print and print-on-demand), and webbook (which can be viewed immediately without export).
Step 1: Create a Book
Contact the OEP team when you are ready to create your text. You will need to provide a working title. Once the OEP team has created a blank book for you, you will receive an automated email asking you to confirm your account.
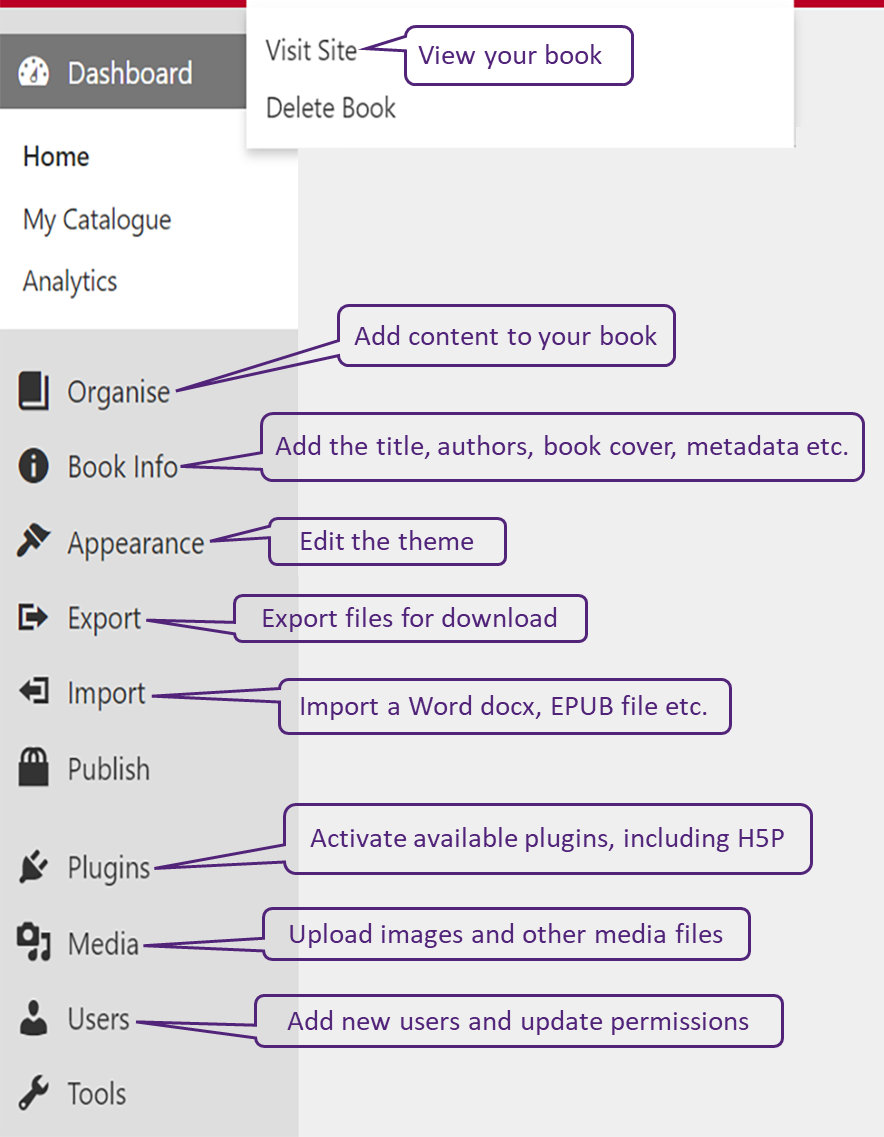
Once you confirm your account, you’ll be able to access your text’s dashboard. From your text’s side-menu you can start adding content and making changes to your book. The different tabs of your dashboard are explained below:
- Visit Site – Hover over the book title to show Visit Site. Allows you to preview your book or view the public version.
- Organise – Click Organise to start adding content
- Book Info – Add the title, authors, book cover, Creative Commons licence, publication date etc
- Appearance – Edit the theme and theme options
- Export – Export PDF and EPUB versions of your book for download
- Import – Import a Microsoft Word docx, EPUB and other formats to upload existing content to the book.
- Plugins – Activate available plugins, including H5P
- Media – Upload images and other media files
- Users – Add new users and update permissions.
Step 2: Add your Book Information
The Book Info page is where you add and edit important information about your book, called metadata. This includes information such as:
- Title
- Author name
- Publication date
- Publisher
- Copyright licence and notice
- Cover image
Some information is mandatory, such as the book’s title and the author’s name, as we use it to automatically build integral parts of your text. Most other elements are optional or can be used only when relevant to your text.
For more information on entering metadata for your book, see the chapter Book Info in the Pressbooks User Guide.
Step 3: Add and Organise your Text
You can add and organise your text from the Organise page which is found in the left sidebar menu of your book’s dashboard.
This will be how you access all of your chapters and content to create or revise your text. You can also reorganise chapters and parts of your book to change the layout.
You will see the three main parts of your book on this page:
Front Matter: Content in this section may include your introduction, foreword, dedication, and more. Read more about Front Matter.
Chapters: This is the main body of your book. The main body can be broken up into several distinct Parts. Learn more about adding Parts and adding Chapters to your book.
Back Matter: Content in this section may include your epilogue, author’s note, appendix, and more. More details can be found in Back Matter.
How to get your Book into Pressbooks
No matter where your manuscript is now – in your head, in another software or even fully produced as an ebook – there’s a way to get it into Pressbooks so you can revise, write or complete it. You’ll find the Pressbooks user interface familiar as it shares common traits with both WordPress and StudyDesk. Here are the basics:
- No matter what stage your book is in, you can copy and paste the text manually into the Pressbooks interface. We recommend pasting as plain text and applying formatting using the tools on the editing page. Pasting in text pre-formatted does not give reliable results, especially in the PDF versions.
- You can write and format your book directly in Pressbooks, which is arguably the simplest method.
- You can also import an entire manuscript that was created in Word. Very careful preparation is essential to reduce work down the track. The Pressbooks User Guide has full instructions.
Uploading Images or Other Media
In addition to embedding content from the source, you can upload images or other media to be housed in the Pressbook itself. Though there is no limit to the overall capacity of a book, any uploaded media must be under 25 MB. You can upload files from your computer or from a URL, or you can add them first to the book’s Media Library.
Once you have uploaded an image, you can also control the appearance and placement of the image by customising size and alignment. You will need to title your image and add alt-tags so that screen readers can display and read all the content properly.
Include all images, artworks and diagrams in your Content Copyright Tracker with details of their original location if not created for this publication. This will enable the UniSQ OEP team to share materials for others to reuse, subject to the Creative Commons licences that have been applied to them.
For more information on working with uploaded media, see the Edit Images chapter in the Pressbooks User Guide.
Step 4: Choose Your Book Theme
Every Pressbooks user has access to more than 20 professionally designed book templates which we call Themes. The theme you choose governs the display of all of your exports, including the PDF, ebook, and webbook formats.
Themes determine the typeface of your text and the chapter title page design, among other features. The themes Pressbooks offers span a large range of genres, from textbooks and monographs to science fiction and romance.
You can browse themes by going to Appearance > Themes.
Searching for Pressbooks Book Themes
Pressbooks has tagged each theme with one or more of the following searchable tags:
- Academic
- Literary
- Nonfiction
- Textbook
- Genre fiction.
These tags represent the kind of book a particular theme is best suited for. You can use the search function at the top of the Themes page to find themes tagged with your preferred term(s). Searching ‘academic’ will show you all the themes designed with academic texts in mind. Some examples of themes intended for academic and educational texts:
Textbooks
- Andreesen
- Bradbury
- Clarke
- Donham
- Graham
- Jacobs
- Lewis
- McLuhan.
Monographs
- Asimov
- Baker
- Bradbury
- Clarke
- Dillard
- Graham
- Luther
- Lewis.
Step 5: Export Your Book
Remember that you need to seek approval through the OEP Team to publish your text openly. However, this step allows you to see and test the various formats available – giving you a clear experience of your text.
You can export book formats from the Export page, found on the left sidebar menu of your book’s dashboard. These formats include:
- Print PDF: Export a print PDF file if you plan to publish your book in print format. This file meets the requirements of printers and print-on-demand services.
- Digital PDF: Export and download the digital PDF instead if you do not plan on printing the file. Digital PDFs can be used online and can contain hyperlinks for easier navigation.
- EPUB: Export an EPUB to make the book available in the file format used by nearly all ebook distributors, including Amazon, Apple’s iBooks, Nook, Kobo, Google Play, Smashwords and many more.
You can also export several other experimental formats of your book. Note that Pressbooks does not provide technical support for any of the following file types:
- XHTML
- HTML book
- OpenDocument
- Pressbooks XML
- WordPress XML
For step-by-step instructions on exporting your book, see the Export chapter in the Pressbooks User Guide.
Prefer to Watch and Learn?
Browse through and watch the Pressbooks Video Tutorial Series.
Chapter Attribution
This chapter has been adapted in parts from:
- ‘5-Steps to Getting Started on Pressbooks’ in Pressbooks User Guide by Pressbooks, licensed under a CC BY 4.0 licence.
- ‘How to Get Your Book in Pressbooks’ in Pressbooks User Guide by Pressbooks, licensed under a CC BY 4.0 licence.
- ‘Choose and Apply a Pressbooks Template’ in Open Educational Resources Collective Publishing Workflow by Council of Australian University Librarians, licensed under a CC BY 4.0 licence.
- ‘Pressbooks Admin Interface Overview‘ in Open Textbooks @UQ Guide and Templates by the University of Queensland, licensed under a CC BY 4.0 licence.
