Accessibility, Usability and Universal Design for Learning
Content advertised as “open access” and “freely accessible” may give the impression that OER are universally accessible, but many users still face inequitable barriers to access. Therefore, accessibility, usability and Universal Design are key considerations to ensuring truly inclusive access to OER.
Aims
- Ensure OER meets institutional and national guidelines or standards for accessibility e.g. W3C standards and guidelines.
- Apply Universal Design for Learning (UDL) Principles in OER creation and open pedagogy.
Actions and Considerations
- Undertake accessibility assessments and usability testing.
- Include accessibility information on OER.
- Think about UDL, usability, and accessibility early on in your process.
Universal Design for Learning
Universal design is the process of creating products (devices, environments, systems and processes) that are usable by people with the widest possible range of abilities, operating within the widest possible range of situations (environments, conditions and circumstances). It arose out of the broader accessibility movement, as well as the advent of adaptive and assistive technology.
In the context of OER, universal design for learning or UDL means removing potential barriers to access for students by designing content for all learning styles.
UDL guidelines are based on the three primary brain networks shown in the slides below:
- Affective networks – The “why” of learning
- Recognition networks – The “what” of learning
- Strategic networks – The “how” of learning
- Multiple means of engagement
- Multiple means of representation
- Multiple means of action and expression
Watch the short video below to learn about the benefits and principles of UDL.
Video: Universal Design for Learning [5 mins, 52 secs]
Note: Close captions are available by clicking on the CC button in the video.
You might find it helpful to see what UDL can look like in learning and teaching. Here are some examples of UDL in a variety of learning environments.
Multiple means of engagement
- Explicitly state learning goals and/or examples
- Provide note-taking support
- Give opportunities to celebrate
- Offer opportunities for reflection
Multiple means of representation
- Provide content in multiple ways
- Employ interactive learning activities
- Use multimedia resources to deliver content
Multiple means of action and expression
- Develop an agenda or learning plan and follow it
- Provide access to resources to deepen learning
- Include a variety of communication options
- Offer opportunities to review content or practice skills
Good Practice Example: Universal Design for Learning in Foundations of Neuroscience
Foundations of Neuroscience explicitly acknowledge they have included multiple means of representation to engage students with the content. This includes clear, accessible text; images and animations; captured video versions of the text and interactive activities.
Accessibility
Accessibility is one of the primary—but not the only—benefits of using UDL principles from the beginning. An OER that is created correctly from the beginning will significantly reduce the barriers to anyone using the OER. There is, moreover, also both a legal and moral impetus for creating accessible resources. Both accessibility and usability need to be built into your development process and should not be an afterthought.
Accessibility checklist
Below is a list of minimum requirements your OER should meet to be considered accessible:
Organising Content
- Content is organised under headings and subheadings.
- Headings and subheadings are used sequentially (e.g. Heading 1, Heading 2)
Images
- Images that convey information include alternative or ‘alt’ text descriptions of the image’s content or function.
- Graphs, charts and maps also include contextual or supporting details in the text surrounding the image.
- Images don’t rely on colour to convey information.
- Purely decorative images contain empty alt-text descriptions. (Descriptive text is unnecessary if the image doesn’t convey contextual content information).
Links
- Links are meaningful in context and don’t use generic text such as ‘click here’ or ‘read more’.
- If a link will open or download a file (like a PDF or Excel file), a textual reference is included in the link information (e.g. ‘[PDF]’).
Tables
- Tables include row and column headers.
- Tables include titles or captions.
- Tables don’t have merged or split cells.
- Tables have adequate cell padding.
Multimedia
- A transcript is available for each audio resource containing relevant non-speech content, including:
- the speaker’s name
- all speech content
- relevant descriptions of speech
- descriptions of relevant non-speech audio
- headings and subheadings
- Videos have captions of all speech content and relevant non-speech content.
- Videos include audio descriptions of contextual visuals (e.g. graphs, charts).
Formulas
- Simple equations use symbols that will be correctly interpreted by screen readers (e.g. minus signs and not hyphens).
- Complex equations are written in MathML or written in such a way they can be translated into MathML (e.g. written in LaTeX and rendered with MathJax).
- Equations are images with alt text descriptions if MathML is not an option.
Font Size
- The font size is 12 points or higher for body text.
- The font size is 9 points for footnotes or end notes.
- Font size can be zoomed to 200 per cent.
Examples – How to Write Good Alt-text
Consult the following resources to learn how to write good alt-text:
Below are three examples of good and bad alt-text.
Example 1

Bad alt-text: Sign
Reason: This is unhelpful – what does ‘sign’ mean? Is it an instruction to add a signature? Sign language? A star sign?
Good alt-text: Sign on the door that says ‘Come in we’re open.’
Reason: A clear description of the image, including text from the sign but without going into excess, unhelpful detail.
Example 2

Bad alt-text: Image of outer-space
Reason: What part of outer space is the photo showing? The moon? A planet? Additionally, there’s no need to start with ‘image of.’
Good alt-text from NASA: Thousands of small galaxies appear across this view. Their colours vary. Some are shades of orange, while others are white. Most appear as fuzzy ovals, but a few have distinct spiral arms. In front of the galaxies are several foreground stars. Most appear blue, and the bright stars have diffraction spikes, forming an eight-pointed star shape. There are also many thin, long, orange arcs that curve around the centre of the image.
Reason: Clear visual details that all can benefit from.
Example 3
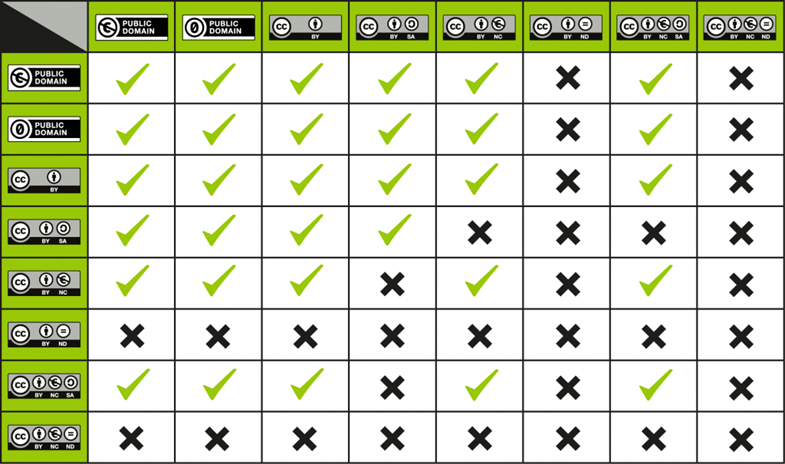
Bad alt-text: A chart showing compatibility between Creative Commons Licences
Reason: The reader does know the compatibility between the licences. Visually-impaired readers would miss out on critical information about the compatibility between Creative Commons licences.
Good alt-text: A chart showing compatibility between Creative Commons Licences. The chart shows that Public Domain and CC BY are compatible with all licences except CC BY-ND and CC-BY-NC-ND. CC BY-SA is compatible with all licences except CC BY-NC, CC BY-ND, CC-BY-NC-SA, and CC-BY-NC-ND. CC BY-NC is compatible with all licences except CC BY-SA, CC BY-ND and CC-BY-NC-ND. CC BY-ND and CC BY-NC-ND aren’t compatible with any other Creative Commons licence. CC BY-NC-SA is compatible with all licences except CC BY-SA, CC BY-ND and CC-BY-NC-ND.
Reason: The compatibility between the licences is written out explicitly so visually-impaired readers are conveyed the same information as sighted readers and can make informed decisions about Creative Commons licences.
Case Study: BCcampus’ Accessibility Journey
This case study describes the work BCcampus Open Education has done to support the creation of accessible open educational resources (OER) in the province of British Columbia, Canada, and beyond. It describes the research and collaboration that went into the creation of the Accessibility Toolkit, a guide designed to support authors in creating accessible OER. In addition, it discusses how BCcampus has supported accessible design more directly, including by remediating existing inaccessible open textbooks and providing professional development opportunities to support others in creating accessible OER from the very beginning. The case study concludes by discussing the challenges that have come up with accessibility, including creating accessible equations, balancing the design considerations of print and digital formats, and making accessible design scalable.
Accessibility Statements
While all OER authors should strive to make OER accessible, not all OER can be made 100% accessible, even with the best efforts. It is important to acknowledge this with an accessibility statement in the OER. In open textbooks, this usually appears in the front or back matter and includes a checklist of accessibility features. In other types of OER, this information might be included in the description. This information will be useful to anyone using special software to navigate the OER; they will know immediately what issues they might encounter. This makes the process a little less frustrating for the user.
What Is an Accessibility Statement?
An accessibility statement lets your users know the work has gone through a review process and that accessibility issues are documented so readers know what to expect. A good accessibility statement includes a way to contact the authors if there are issues.
Accessibility review is for everyone, not just readers with special needs. Just like closed-captioning benefits those with hearing loss and those with certain types of learning difficulties, integrating accessibility into your workflow will benefit all your users/readers.
Writing an Accessibility Statement
Here are tips for writing a useful accessibility statement from the Open Education Accessibility Toolkit by Coolidge et al. (2018):
- Use clear and simple language, avoiding jargon and technical terms
- Include information about how people can personalise their experience. This might include information about:
- features of the platform used for the resource (e.g., if a book is in Pressbooks, mention the ability of users to increase the font size in the web book)
- the ability to change browser settings
- a link to each available file format
- assistive technologies
- Outline specific accessibility features and how to use them when relevant
- Do not make false claims or ignore known accessibility issues. Be as transparent and open about accessibility barriers as possible. This means:
- describing what is being done to fix the problem and a timeline
- providing any temporary workarounds
- Include information about who is responsible for the accessibility of the content and their contact information so people can submit issues, suggestions, or complaints related to accessibility.
- Describe the organisation’s accessibility policy and the work that has been done to make the resource accessible. Here, you can provide information like:
- accessibility guidelines you are following (e.g., WCAG 2.0)
- any federal, provincial, or state legislation you are conforming to
- any user testing you performed (Gray, 2018)
It is important to keep your accessibility statement page up to date as you make updates to the content, or if the software itself is updated to be more accessible. Conduct an annual review if possible.
Good Practice Examples – Accessibility Statements
Here are some sample accessibility statements that you can adapt for your purposes:
- OpenStax Accessibility Statement
- BCcampus Accessibility Statement
- Nomensa: How to Write an Accessibility Statement
Your accessibility statement should also include contact information in case any issues need addressing.
Usability
Usability is a way to measure how easily and well a user can navigate a specific site to complete a task. You have probably heard of usability testing on websites or may have participated in a usability test yourself. According to Nielsen, a leader in usability studies,
“Usability” is defined by five quality components:
- Learnability: How easy is it for users to accomplish basic tasks the first time they encounter the design?
- Efficiency: Once users have learned the design, how quickly can they perform tasks?
- Memorability: When users return to the design after a period of not using it, how easily can they reestablish proficiency?
- Errors: How many errors do users make, how severe are these errors, and how easily can they recover from the errors?
- Satisfaction: How pleasant is it to use the design?
There are many other important quality attributes. A key one is utility, which refers to the design’s functionality: Does it do what users need?” (Nielsen 2012)
There are many resources available to help you understand the importance of usability, such as the What is Usability website which explains how to design for optimum usability (Interaction Design Foundation, n.d.). It is a good basic overview of the concepts and principles for creating usable websites, and many of the concepts can be applied to OER.
There are also some rubrics you can use to validate the usability of your OER. For example, the Washington State University web communication page includes a 25-point list of how to design for optimum usability and a printable rubric for reviewing your website.
Usability Testing
Doing a usability review or audit can help you identify the pain points in the OER. You may not have control over some things, such as the hosting platform not being completely accessible or you cannot integrate certain functionality. In other cases, you may be able to catch problems early and correct them before the development process goes any further. Keep in mind that a usability review is not a definitive process but one tool that you can use to make the OER as user-friendly as possible. For more guidance on doing a usability review, see A Quick Guide to Conducting a Usability Review).
Beta Testing
Beta testing is one way to determine the usability of your product (Dennen and Bagdy 2019). Rather than publishing the OER or releasing the module to the public and then using it in the classroom, do some beta testing by using the text in the classroom before actually publishing it. Instructors can use the text in a PDF or Word format in the classroom and get feedback from students about the content, layout, and design before creating the work on its final platform, where it might be more challenging to edit the content later. Another option is to have colleagues review the content before rollout (a peer review of sorts) or engage the students and authors in focus groups about the text to make improvements. All of this information will help in the creation of a usable final product. Once published, you will still want to be open to additional feedback from students and other users, but the majority of the feedback from your students should happen pre-publication.
Activity: Redesign or Accommodate?
The “Redesign or Accommodation?” activity is grounded in student-centred Universal Design for Learning (UDL)—a framework that recognises that we cannot design learning experiences for a specific type of student.
“Redesign or Accommodation?” also incorporates the humanising element of student Personas. Each participant adopts a Persona and advocates from that student’s perspective when presented with a Scenario that is based on common or recurring components of course delivery.
In facilitated discussions, participants identify potential barriers that the Scenario presents for their Persona-selves, consider what accommodations to address the barrier would look like—and if their Persona would even qualify to receive one, and then determine if the barrier/s could be avoided entirely by applying a UDL-based redesign to the course components in question.
We have created several Scenarios for this activity, but we also recommend you try running Scenarios arising from your practice and within your own institution against your Persona-based selves; it may help to proactively identify and address barriers before they affect your students.
Below are assorted “Redesign or Accommodation?” activity materials.
- Redesign or Accommodation Activity Guidelines [PDF file]
- Redesign or Accommodation Scenarios [PDF file]
Personas:
- Redesign or Accommodation Persona Cards (Detailed) [PDF file]
- Persona Cards for Printing [PDF file]
- Additional Personas for Course Design by OSU Ecampus [PDF file]
This activity is from BCCampus’s Accessibility Toolkit used under a CC BY 4.0 licence.
Resources
Universal Design for Learning
- CAST’s UDL Guidelines: The UDL Guidelines are a tool used in the implementation of Universal Design for Learning, a framework to improve and optimize teaching and learning for all people based on scientific insights into how humans learn.
- Universal Design for Learning (UDL) for Inclusion, Diversity, Equity, and Accessibility (IDEA): This guide will help instructors and others to incorporate principles of UDL and considerations of EDI and Indigenisation in their learning environments.
- A Comprehensive Guide to Applying Universal Design for Learning: A collection of three UDL workbooks.
- UDL Tools for all Grades and Subject Areas: a collection of UDL tools and worksheets for all grades and subject areas.
- Seven Principles for UDL: The purpose of the seven Principles is to guide the design of environments, products and communications.
Accessibility
- BcCampus’s Accessibility Toolkit: The goal of this accessibility toolkit, is to provide resources for each content creator, instructional designer, educational technologist, librarian, administrator, and teaching assistant to create a truly open textbook—one that is free and accessible for all students.
- Web Content Accessibility Guidelines (WCAG): Worldwide guidelines for web accessibility to ensure web content is available to all
- How to Ensure Accessibility for Educational Videos: an article that addressed how to make videos accessible.
- H5P Content Type Accessibility: a list of H5P content and whether it is accessible.
- Dos and don’ts on designing for accessibility: The dos and don’ts of designing for accessibility are general best practice guidelines. Currently, there are six different posters in the series that cater to users from these areas: low vision, D/deaf and hard of hearing, dyslexia, motor disabilities, users on the autistic spectrum and users of screen readers
- Australian Inclusive Publishing Initiative guides: two helpful guides for the publishing and disability sectors. The first guide offers publishers a set of workflow strategies for creating accessible digital books that are inclusive by design. The second guide explains the legal environment for making books accessible to those with a print disability.
- How to describe images: a guide to writing Alt-text descriptions.
Usability
- A Quick Guide to Conducting a Usability Review: an article on how anyone can conduct a usability review using a simple process.
Copyright note: This section has been adapted in part from:
- Universal Design for Learning (UDL) for Inclusion, Diversity, Equity, and Accessibility (IDEA) by Darla Benton Kearney, licensed under a CC BY 4.0 licence.
- ‘Universal Design, Accessibility, and Usability for OER‘ by Stefanie Buck in The OER Starter Kit for Program Managers by Abbey Elder, licensed under a CC BY 4.0 licence.
- ‘Appendix A: Checklist for Accessibility,’ ‘Using Personas,’ and ‘Accessibility Statements’ and in B.C. Open Textbook Accessibility Toolkit (2nd ed.) by Amanda Coolidge, Sue Donner and Tara Robertson, used under a CC BY 4.0 licence.
- NASA’s stellar alt-text description. Public Domain.
